Monday 28 September 2015

Breakfast Time!!!! :)

Breakfast Time!!!
One of the common topics among mummies is what we can feed our toddlers, especially for breakfast when they are still in dreamland. (ZZzzz….)
Breakfast time is usually quite a rush, be it on a weekday or weekend. Weekdays, we are either rushing for school or work and sometimes kiddos are being dragged out of bed and you can experience grumpiness in a new level each time. Weekends, if the child is not sleepy, we may also be facing an active child, who is assessing the taste, looks and even plating more stringent than usual. (Life of a mother is so tough! ARGH!)
A quick survey among some mummies showed that we hope that the breakfast offered to our kids can be:
(1)  Healthy
(2)  Tasty
(3)  Attractive
(4)  Filling
(5)  Easy to prepare (FAST preferably)

Eight (Huat!) dishes I prepare for my kiddos’ breakfast are:
**: Very Good
: Good
- : Neutral


Healthy
Tasty
Attractive
Filling
Easy / Fast
1
Cheese Omelette
- Fry the egg, put a slice of cheese. Done!
*
*
-
*
*
2
Cereal with milk
- Fruits can be added, OR just given after
We usually buy cheerios because it is not too sweet and healthier.

*
*
*
*
**
3
Sandwiches
- can be quite dry if you use spread, hence have to compensate by making it attractive. Please purchase sandwich shape cutters.
*
-
-
*
*
4
Steamed Man Tou
- These are frozen and come in so many flavours. My kids love the chocolate and yam man tou. Nice purple swirls!
- You can steam it using a wok or steamer. Otherwise, wrap the man tou with slightly wet kitchen towel and put it on HIGH for 2 min in the microwave.

-
-
*
*
*
5
Prata with fruits/cheese/chocolate rice/egg
- Frozen prata is always in my freezer as it has so much potential to become all sorts of meals!
- I use to pan fry it when some butter previously. However, pan frying means you have to watch the fire which limits me to prepare other things. Hence, nowadays I just pop it into the oven toaster with a bit of butter and set the timer.
-
**
-
(unless you use rainbow rice)
*
-
6
Yam and Sweet Potato rice balls (小汤圆)
 - Frozen again! Colourful (Yellow and purple) and easy to prepare.
- Bring the water to boil, let the kid participate by letting him/her put the rice balls in and together wait and watch them float.
- For the soup base, you can just prepare some warm honey or warm milk. We used strawberry milk before and the colours were lovely and the kids had fun scooping the rice balls!
*
*
**
*
*
7
Omelette cups
- You need a cupcake tray and the attractive value will increase immediately! Especially the small bite-size kind.
- put in the ingredients you like and pour in the egg mixture, top it with some cheese and bake it till cooked!
- ingredients I put in are chopped onions, mixed vegetable (frozen kind), ham/sausage and crashed frozen hash brown.

*
**
*
*
-
8
Oven Baked Donut Balls
Special introduction for this dish! Read on and try making these!
**
**
*
**
**
Oven Baked Donut Balls
Oven Baked Donut balls are a lighter and easier alternative to traditional deep fried donuts.
Steps:
(1)  Combine the ingredients
(2)  Put them into donut tray or mini cupcake trays or simply cupcake sleeves
(3)  Bake them till golden brown. (5-8min? Just observe for the first time then adapt accordingly)
I usually sprinkle some icing sugar on top to make the balls/cakes prettier. You can even put those sugar shapes before you send them into the oven. J


You can even make cupcakes with this recipe! Last minute birthday celebration is no longer difficult!
Easy enough for kids to participate!
Ingredient List:
1 Cup of self-raising flour
1/3 Cup of Icing Sugar
1 Teaspoon of Vanilla Extract
1 Cup of Low Fat Blueberry Yogurt
(I always have cups of yogurt in my fridge as they serve as good tea break or after meal dessert. You can change the flavour depending on what you have in the fridge.)
1 Egg
Some Fresh Blueberries/soft fruits (optional)

Hope this post is able to help you to welcome every morning with more confidence and joy! Do share with me more breakfast ideas that I can try out!

Say with me now, I Love Breakfast Time!

Monday 31 August 2015

What to do for teacher's day?!

It's Teacher's Day again!

6 years as a teacher, I have to say that I totally love Teacher's day! Students saying thank you and putting their heart and energy into making little tokens, it has this little magic of making one year of hard work seems very worth it. Hahaha I know this sounds superficial but who doesn't like to feel appreciated!?

Anyway, since that's how a teacher feels, it is important that we as parents take this special occasion to be a teachable moment for our children to learn about being thankful with action.

With this, let me introduce to you our family's way of appreciating the childcare centre teachers for year 2015!

We decided to let the children bake some simple sugar cookies. Something smaller (cheaper) as we are going to give the school a paper cutter, after observing the teachers always cutting papers with a pair of scissors. 

From experience, I always prefer cookies coming in air tight containers, because:
(1) they won't be crushed easily and make a mess in my bag
(2) they will stay crispy longer and I can slowly enjoy these sweet treats
(3) I can reuse the containers

Hence, we got small square containers at 3 for $2, from Japan Home.

The children started with cleaning the containers and alphabet moulds with food grade dish cleanser.

We were very impressed with Nathan's ability and patience to complete the task properly. Other than washing carefully with the sponge, he also changed the water a few times to ensure that the soap was rinsed off well.


Phoebe did well with the mould too, with Elvin's guidance. She had fun identifying the letters hence able to last longer on the job.


We lay a clean towel on the floor to let the kids dry the items. 


Left the containers to dry under the fan while we had dinner. It is very important that the containers are fully dried so that the cookies can stay crispy longer. :)

Ok! Time to make the cookies!
We did the cookie mix by a bit of gut feel, mixing self raising flour with icing sugar, butter, egg and vanilla essence. Simple and nice. But if you are not so garang and gung-ho like us, we recommend the Betty Crocker Sugar Cookie Mix. Please remember to add that one more tablespoon of flour for cut out cookies!


We wanted to make alphabet cookies but they didn't turn out defined enough so we decided to go original and rustic. AUTHENTIC. (All sorts of vocabulary just so I can justify how the cookies looked like in the end)

TADANG! Kids just roll the dough into balls and flatten them! Then we put some cute little red sugar hearts and send for bake!


Aesthetically not the best but sincerity 100%!

While the cookies were baking, we started to decorate the containers. I pasted scripture tape on the containers. You can get them from http://www.projectencourage.net MY FAVOURITE ONLINE SHOP for Christian craft items!


The kids pasted stickers on the lids and it is really interesting how they decided what to put and which should go to which teacher.


Time to pack!


"Stop stealing the cookies, Phoebe!"
"Nathan! I saw that! Stop licking your hand!"


These are the end products! 
Simple and presentable and most importantly, very manageable with the kids. :)


I hope this little tutorial is in time for some of you! :)

HAPPY TEACHER'S DAY! :)

Thursday 7 May 2015

Just in time for Mother's Day! (Potted flower craft)

Okok! Counting down to Mother's Day! 3 more days!

Have been so overwhelmed with work that I haven't really found time to think of what the kids should prepare for their grandmothers. (And one for myself) I rely on my faithful friend, Pinterest. She is all knowing and all reliable. :)

Anyway, this whole project didn't take us more than 30min but the result is beautiful! (Quoting phoebe: Niceeeeeee!)


These are the materials you will need:

- styrofoam cups for POT
- plastic spoons for STEM
- scissors for CUTTING petals
- double sided tape to secure petals on SPOON
- glue to STICK the petals
- super glue to secure the POM-POMS on flower
- permanent oil base markers to COLOUR the pot (u can use paint but it's too much a mess for me)
- pipe cleaners (optional) for LEAVES (the original post didn't have leaves but I like mine with)
- colour papers for the PETALS

What are the steps?

(1) design the pot! 
For older kids, it would be designing. Younger ones, merely colour and smearing is good enough. (Rustic look, I love it!)

Phoebe has been into stickers so I let her paste some stickers on the pot.


2) Cut the petals
For me, I traced the lines of the petals for Nathan to cut. He is a little too young to cut from imagination and visualising.. 

To save time, you can fold the paper into half. One round of cutting, two petals! 


3) Paste the 6 petals together to form a flower

Do not worry about the center not overlapping nicely because you will eventually put a pom-Pom over. Also, *puts on my auntie voice* a bit off then got the feel mah!

4) paste the completed paper flower on the spoon (pre-taped with two short strips double sided tape)

Be daring to press and secure the flower properly. 

5) Apply super glue, press pompom down on the center of flower. 

I counted ten with Nathan while we pressed it down with strength.


6) Colour the "stem"


7) Poke the spoon into the bottom of the cup

8) *optional* Add the leaves

Poke one end of pipe cleaner into cup, near the stem, twist and form leaf.
Twist one round around the stem and poke the other end of pipe cleaner into cup and twist to form flower. 

9) TAKE A PHOTO WITH THE END PRODUCT!


Sunday 25 January 2015

Our best friend: Thomas the Train

This is a long overdue post but I really want to document it because much effort was put it and much joy and fulfillment was experienced! One thing for sure, I can sing the entire Thomas the Train theme song and I know many of Thomas' friends name. I'm feel so accomplished. :)

When we asked Nathan how he wanted his birthday party to be, without a doubt, while holding his Thomas and Percy and James, he said, "THOMAS THE TRAIN!" And so the research and preparation began...

This thing about party planning for us is to have (must-have):
(1) an invite
(2) a door gift
(3) an activity
(4) decoration (back drop/ photobook inclusive)
(5) cake
(6) food

And, it must be within a theme.

It is important to have a theme (I think I mentioned a year back when I did Phoebe's full month) because it made everything easier, you have a direction and you just keep within it.

(1) Invitation card
It is never too difficult because you just have to google free printables for ____. You can get almost every kind of themes. From invite to food labels, bottle labels, banners to gift tags (some even gift bags!), you have it already! Just put in the words and details, tadang! You are done!


(2) door gift
I just like the idea of leaving an event or party with something to remember and the item must be useful.
Nathan's first birthday, we had a keychain station which allowed guests to make their own personalized keychains using shrinking film. Phoebe's full month was shower sponge and when she was one, we gave bottle/vase with chalked front and chalks. 

Phoebe's first birthday door gifts

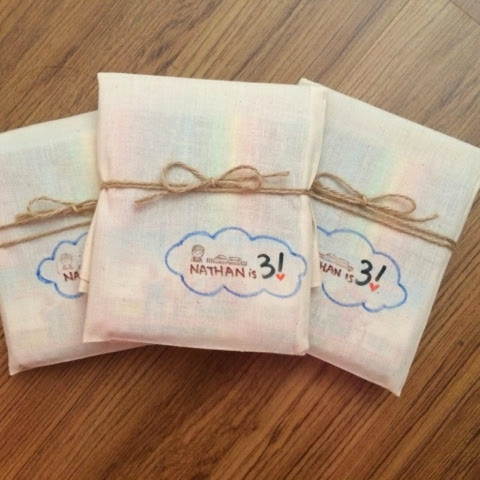
This time, we took some time to decide.. Wanted to give conductor's whistle but couldn't find, small craft train sets are a bit childish.. Thank God for Muji! Muji sells tote bags in many sizes. I used their A4 and A3 ones to make personalized bags for colleagues and students before. This round we chose the smallest one and stamped+drew on them. We attempted to make it look like the Thomas and friends logo. Hahaha..


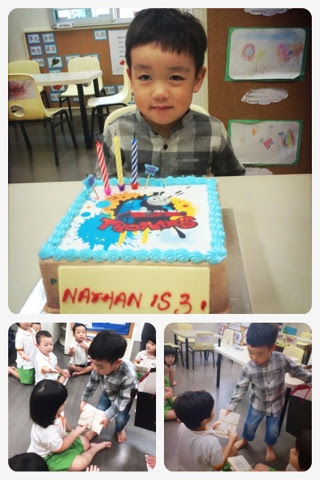
These were for his classmates, with a set of magic colour pens in them. Nathan distributed these during his school celebration. :)


For those attending the party, we set up a "baggage claim" counter. Guests can take a bag and personalize it with the stamps and fabric markers! 


Young or old, craft always work!

Happy guests!

Adults took it another level altogether!

(3) activity
Usually, I'll try to incorporate it with the door gift. In this case, I think the adults are well entertained with the bags. For kids, I fully understand that parties when not in an indoor playground, can be boring sometimes.. Also, this time, we are using the communal hall under our block (only $20 for a full day!) , there is no tables and chairs.

So firstly, to settle the inconvenience of children being unable to eat holding a plate like adults, we wrapped boxes with brown paper to make small tables! Also to use it as decoration, calling them crates! Hahaha crates at a train station, make sense?

We also placed some crayons in an ikea cup (I love Ikea) and coloring sheets. The kids were well entertained colouring away I think. Hahaha.. Again the colouring sheets must be within the theme ah!


We also set up a make shift "cinema" which we called it "Rest Stop" and screened some Christian Children MTVs. 
Feedback from parents was positive as they could comfortably have their meals and chat with other friends.

To make the corner cosy, we also brought our carpet and kiddy chairs!


(4) decoration (back drop/ photobook inclusive)

I love to do parties because I like how everything can be stringed together and love the brightened faces of the kids and the guests. 

This time, Elvin and I decided to make "real" trains for Nathan! 


Don't worry, these are not difficult. Just VERY time consuming. Basically, just get big boxes and cut them. Instead of painting like what most people would, please please please just wrap it with the correct shade of paper. If u paint it, most probably it will stain your hand and clothes even when dried. For best effect, cutting solid shapes to get the design is the best. You don't have to worry about uneven brushes. As for the face, I was thinking if I wanted to paint it or cut shapes to piece it, BUT I realised Nathan could identify which face belongs to which character when they looked so similar. So I'm not gonna try. Elvin printed the faces and we just stuck it on! Initially we wanted to add a sling/strap but decided not to because it may be too heavy for the kids.


We also made a railway station using our rattan partition. And made a signboard "Nathan Railway". It is now hanging in Nathan's room and he totally loves it! 

For the tracks, black duct tape and brown tape are all you need! :) easy and nice!


As for the cake table, we just simply put out the train set and place the "trucks" on. :)


Okok this entry is too long and I'm falling asleep. Let's just end with one photo of the three big boys who attempted to put on the trains' face. 

Be entertained! :)

P/s: this is an add on. I don't like cakes that need to be cut to distribute.. so it's always individual portion kinda cakes. So cupcakes will always be my top choice!